This wizard guides you through the process of defining a minimum number of corresponding points, depending on whether you want to perform SmartFusion™ initialization or manual alignment.
Instructions on how to indicate the corresponding points are provided. A number of actions help you to work with the defined points.
Messages ![]() will be displayed in the Warnings section on the left, informing you how many virtual points you have defined. Should any issues with the defined points arise, warnings will be shown
will be displayed in the Warnings section on the left, informing you how many virtual points you have defined. Should any issues with the defined points arise, warnings will be shown ![]() .
.

1. When entering the wizard, the Insert points action  is activated.
2. Click a specific position in the left pane on the teeth of the patient model.
3. Click the corresponding position on the dental scan in the right pane.
Repeat steps 2 and 3 until you have defined three pairs of corresponding points.
4. Check whether there are any warnings in the warnings section of the wizard.
5. When a message states that the requested number of pairs is indicated, click Finish to close the wizard. Make sure all warnings are addressed - and resolved when needed - before closing the wizard, otherwise, you may not be able to finish.
Tip
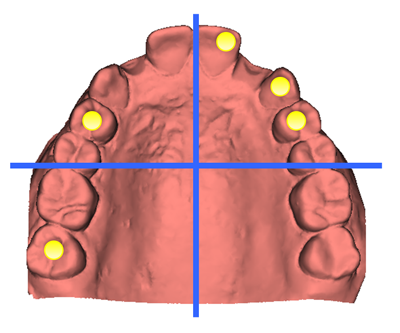
Make sure the points you add are distributed over the complete dental arch. Avoid clustering. The larger the area covered, the more likely it is that the alignment will be executed correctly. Place points in at least two out of four quadrants as shown in the image below.

Note
If the options to remove points are disabled, right-click to finish the Insert points action. The other actions will be enabled once the required points are inserted.
To remove selected points:
1. Select a point in one of the viewers.
2. Click Remove selected points  .
.
3. The selected point and its corresponding point are removed.
To remove all indicated points, click Remove all points  .
.