Create a Virtual Surgical Splint
To create a virtual surgical splint:
On the Transfer tab, click  Surgical splint.
Notes
If any unsaved changes are available in the surgery plan, a dialog pops up to save the changes. Click Save to do so.
This action is not available for surgery models that were created without dental scans.
The Surgical Splint wizard opens. When both a maxilla and mandible body are osteotomized, the page is shown to define the jaw opening in order to correctly fit the intermediate splint. When only one jaw is segmented, immediately go to step 4.
Make sure the correct surgery type is selected from the Splint type list. Choose between Maxilla first or Mandible first. The parts that will be moved are colored blue in the 3D viewer.
Drag the Set mandible autorotation slider to open or close the jaw to allow a correct fit for the intermediate splint.
If the axis around which the jaw rotates is incorrect, adjust it in the Adjust autorotation axis wizard.
Click Next. If intersecting models are detected, a message pops up advising you to adjust the autorotation. However, when imaging artifacts, for example, cause the intersecting models warning, verify whether there is no occlusal interference and click Continue.
Drag the control points to indicate the dental arch on the upper and lower cast. Ensure that the most distal molars are not covered by the set surgical splint range and that all indicated points are placed on the model.
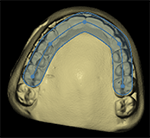
Click Next. When the splint calculation is finished, use the 3D viewers to inspect the calculated surgical splint model(s). If an intermediate and a final splint are calculated, inspection of both models can be done on the respective wizard pages.
Change the Splint thickness by dragging the slider.
To add a buccal extension with wire holes, click Include buccal extension. Click on the pink plane to add wire holes  . Right-click to finish. Adjust the location and orientation of the wire holes by clicking and dragging the end points. To remove a wire hole, select the wire hole and click Remove selected wire hole. Click Done. The wire holes are calculated.
Click Next. If enabled in the preferences, a tag and/or a removable label can be added to the splint.
Click on the splint on the location where you want to emboss the 'I' (intermediate) or 'F' (final) tag.
Enter the characters to be added to the removable label (2 lines of up to 8 characters can be added). Click Apply.
Click Next to move from the intermediate splint page to the final splint page. Make sure there is no interference of the splint(s) with the dental brackets. Make sure there is a good fit with the dental arch. Also for the final splint file you can change the splint thickness, change the autorotation, include buccal extensions or add tags and labels (see steps 5 and 6).
Click Finish.
A message states that the generated splint files are only valid for the current surgical plan. Click OK. The surgical plan is locked.
Note
If changes need to be made to the current surgical plan, unlock the plan.
After creating the splint files, you can order the splint via IPS Gate or export the file for local production.