Planning an Implant
To plan an implant in a workspace that contains (CB)CT data or an IO scan that is aligned to the 3D X-ray:
Click Plan on the menu bar.
Click  Add Implant to plan an implant manually.
Note
For a single tooth or two neighboring teeth, an initial position for implants can be calculated: see Auto Plan.
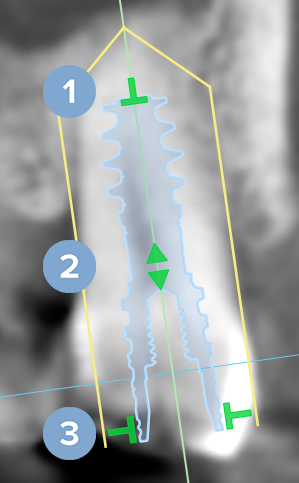
Indicate the implant's shoulder and tip point.
A tooth number is automatically assigned to the implant, equal to the tooth annotation closest to the shoulder point. The automatic tooth number and implant and sleeve details can be adjusted in the smart panel, as well as selecting an Abutment and its details for this implant.
Notes
— At the top of the list you will find the most recently used abutments for this type of implant.
— When selecting a different implant, the system will strive to match the parameters as closely as possible to those of the previously selected implant .
Manipulating Implants
To change the implant's position and properties, multiple options are available.
When hovering over the different regions, the mouse cursor will change to show ![]() translation or
translation or ![]() rotation . Click and drag to apply the action.
rotation . Click and drag to apply the action.
|
|
Notes
The implant can also be rotated by right-clicking the implant, selecting Adjust rotation, and using the slider.
Implant Details
To see or to edit the implant details, right-click the implant in one of the viewers and select Edit implant details.
Alternatively, hover over the implant on the Implant plan smart panel, and click the ![]() arrow.
arrow.
Locking an Implant
To lock an implant, right-click the implant in one of the viewers and select Lock.
Alternatively, hover over the implant on the Implant plan smart panel, click the ![]() arrow, click
arrow, click  , and select Lock.