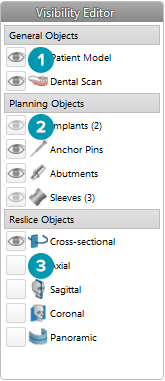
During the treatment planning, different objects will exist in the view scene such as skull parts, implants, measurements, etc. The Visibility Editor allows editing the visibility of all these different objects in a straightforward way. It is located in the side bar at the right of the workspace.
Note
In this editor it is only possible to set the visibility of object groups.
Different visibility icons are available for group objects:
1. When the
black visibility icon ![]() is
displayed in front of the group, all objects belonging to the group are
on display.
is
displayed in front of the group, all objects belonging to the group are
on display.
2. When the
gray visibility icon  is shown in front
of the group, one or more objects in the group are hidden, while others
are still shown.
is shown in front
of the group, one or more objects in the group are hidden, while others
are still shown.
3. When no icon is displayed in front of the group, all objects belonging to the group are hidden.
Note
When the Planning side bar is collapsed, the Visibility Editor is reduced to a single icon. To expand the Visibility Editor, click the icon. The Visibility Editor pops up in the bottom-right corner of the screen.
To hide the objects belonging to an object group:
1. In the Visibility Editor, click the visibility icon
![]() of the object group you want to hide.
of the object group you want to hide.
2. All the objects belonging to this group are hidden.
To show the hidden objects belonging to an object group:
1. Click the square
where either no visibility icon or a gray visibility icon is displayed.
2. All objects
in the selected object group are displayed again. The black visibility
icon ![]() is displayed in front of the group.
is displayed in front of the group.