Diagnostic Findings
Add dental pathologies, jaw problems or other diagnostic findings to the diagnosis.
Adding a Diagnostic Finding
Notes
If the finding is added in the tooth workspace, the finding is added to the specific tooth.
If the finding is created in another workspace, click the tooth number placeholder and type the tooth number to assign the finding to a specific tooth.
To add a predefined diagnostic finding, click Add finding ![]() in the Diagnose tools menu. Alternatively, go to the SmartPanel Findings tab.
in the Diagnose tools menu. Alternatively, go to the SmartPanel Findings tab.
Select a finding in the drop-down list. To narrow down the results, enter (a part of) the name.
To add a diagnostic finding that is not in the list, enter the custom name in the search field and click Add or press Enter.
Optionally, add more information:
To add a note, select the tile with the finding and type the note in the text box.
To capture a screenshot, select the tile with the finding and click Screenshots  .
.
Note
To add a note on patient level, go the diagnosis in the patient menu.
Removing a Diagnostic Finding
To remove the finding:
Hover over the tile with the finding.
Click  and select Delete.
Tooth Chart
In the tooth workspace and endo workspace, a tooth chart is shown above the SmartPanel tab.
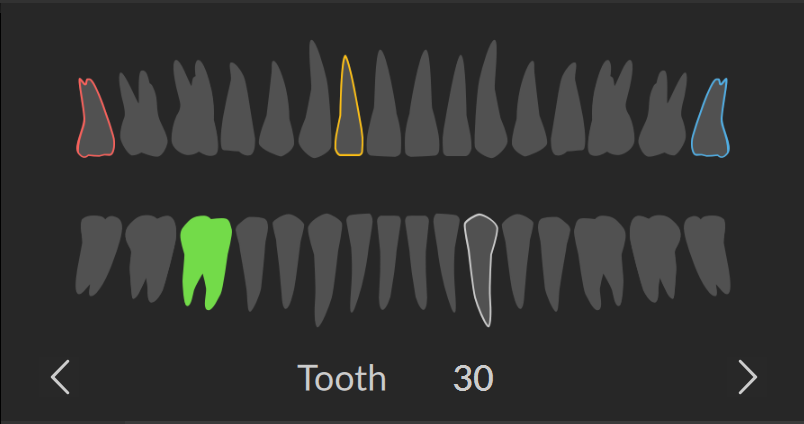
The active tooth, for which the data are shown in the workspace, is highlighted in green.
Select another tooth by clicking a tooth on the tooth chart.
Press the ![]() or
or ![]() arrow key to go to the previous tooth or next tooth. Alternatively, click
arrow key to go to the previous tooth or next tooth. Alternatively, click ![]() or
or ![]() .
.
A tooth with at least one finding has a colored outline. The color depends on the treatment status of the finding.
To define the treatment status of a finding, select on the following statuses:
| Status | Description | Color |
| Condition | The finding is not critical, but may need to be watched to track its evolution over time. | Gray |
| Treatment plan | The finding needs to be treated. | Red |
| Follow-up | The finding is discovered at an early stage and should be watched. | Yellow |
| Completed | The treatment for this finding has been completed. | Blue |
Note
If the patient is younger than eight years old, the navigation tooth chart for primary teeth is shown. To make changes to the tooth chart (exchanging primary teeth with adult teeth, indicating which teeth are missing, etc.), go to the diagnosis in the patient menu.
Bookmark
The moment you add a finding, the current workspace configuration is saved as a bookmark for this finding.
The bookmark allows you to navigate back to the workspace where the tooth pathology can be clearly seen.
To navigate back to the bookmark, select the finding, hover the tooth icon in front of the finding, and click on the appearing arrow.
To replace the bookmarked configuration with the current configuration, click and select Bookmark.