3D Visualization
To choose the rendering of the scanned patient model:
On the smart panel, select the Viewer tab.
In the 3D Visualization group (only available in ![]() DTX Studio™ Clinic Pro), click a transfer function thumbnail to choose how the 3D volume is rendered.
DTX Studio™ Clinic Pro), click a transfer function thumbnail to choose how the 3D volume is rendered.
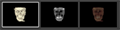
When rendering or generating a volume, each gray value needs to be mapped to a specific color with a certain opacity. This is arranged by means of a transfer function, which assigns RGB values and opacity to every voxel in the volume. By applying the transfer function, the 3D volume is visualized. The thumbnails represent the different available transfer functions.
Clipping the 3D Volume
Select Clip 3D visualization, to hide part of the 3D volume and inspect certain areas of the volume. The clipping is applied according to the plane that is selected in the dropdown menu. To clip the volume in a different direction, choose a different plane.
To mirror the clipping effect, click Mirror clipping region ![]() , and the opposite part of the clipped volume will be displayed.
, and the opposite part of the clipped volume will be displayed.
Once Clip 3D visualization has been selected, you can change the position of the reslices or scroll through them and the clipping will update in the 3D viewer. Please note that all the objects will be clipped together with the 3D volume, except for airway annotations.