Annex 2: Scan protocol for IPS CaseDesigner®
To create a virtual augmented skull model from CT-data a patient scan needs to be performed. To digitize the patient and the desired maxillofacial outcome an occlusion scan and a scan of the dental cast need to be made as well.
Scans of the patient, the occlusion and the dental cast should be made with much care as the final result will depend on the accuracy of the scans. To obtain optimal results take into account the following procedures.
Bite registration
When taking the bite impression, ensure that the patient bites down deep enough into the impression material. The material should cover all of the desired areas for the impression. When the patient is wearing braces, make sure the impression material also covers the brackets at least up until the archwire.
(CB)CT-scan of the patient
For medical CT-scanners, the patient should be positioned in such a way that the occlusal plane coincides with the axial slices. This can be checked using the scanner's laser pointers and on the scout view. It is important to reduce the number of slices affected by artifacts due to metal restorations or amalgam dental fillings. No gantry tilt is allowed.
It is the responsibility of the clinician or radiology department to generate images of optimal quality according to the standard routine.
To get the best possible result, please make sure that:
there is no (foreign) radiopaque material in the patient's mouth during the scan.
a scan is performed of the full dentomaxillofacial complex, including all areas of interest in the anterior craniomaxillofacial volume.
the patient does not move during the actual scanning. Please do not use bandages to fixate the patient as this will deform the soft tissue or modify its position.
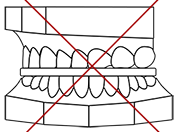
Occlusion scan protocol
To scan the final occlusion:
Fixate the lower and upper casts into the correct occlusion.
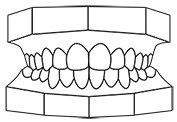
Tip
Stick adhesive radiolucent material (wax, for example) to the sides of both casts, or use radiolucent rubber bands to fixate the occlusion without causing artifacts in the scan result.
Place a firm sponge in the scanner.
Place the fixated casts on the sponge in the scanner.
Important
Position the casts in the scanner in a similar orientation as in the patient scan. In the case of a medical CT the casts might have to be positioned vertically. Ensure that the cast is attached with the upper dentition side to the radiolucent material and that the impression does not touch the CT table. The material used to properly position the casts should be as radiolucent as possible.
Perform the scan.
Tip
Always perform the scan according to the high-resolution scan protocol and with a recommended voxel size of 0.2 mm.
Remove the casts, but leave the lower sponge in place in the scanner. This is important to make sure the dental cast scan and the occlusion scan are registered at the same position within the scanner.
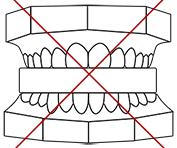
Dental casts scan protocol
To make a scan of the dental cast which leads to optimal results during the alignment of occlusion scan and dental cast scan:
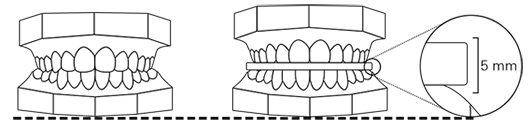
Place the lower cast on the sponge that was left in the scanner after making the occlusion scan, the teeth facing upward. Make sure the orientation of the dental cast scan is identical to the orientation of the occlusion scan.
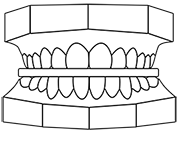
Place another firm sponge (preferably between 2 mm and 10 mm) on top of the lower cast. This will ensure a clear distinction between the two casts in the scanned files, without the gap being too big.
Put the upper cast on top of it, teeth facing down. Make sure that upper and lower casts are positioned as if they were in a correct occlusion, but separated by the sponge.
Important
Position the casts in the scanner in a similar orientation as in the patient scan. In the case of a medical CT the casts might have to be positioned vertically. Ensure that the cast is attached with the upper dentition side to the radiolucent material and that the impression does not touch the CT table. The material used to properly position the casts should be as radiolucent as possible.
Perform the scan.
Tip
Always perform the scan according to the high-resolution scan protocol and with a 0.2 mm voxel size.
Dos and don’ts
Make sure:
to use no other material but plaster to create the surgery models.
to perform the occlusion scan and the scan of the dental cast with the same scanner and the same scan protocol.
to scan the same upper and lower cast to create both the surgery model and the occlusion model. When the models are to be used in virtual segmental surgery, the casts should be as identical as possible.
that the complete upper and lower casts are scanned. An incompletely scanned base, for example, may result in alignment issues.
to scan the models in the correct orientation. Also when generating STL files for the occlusion scan and dental cast scan, the correct orientation of both jaws is of major importance.
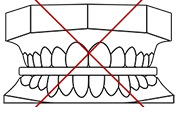
that the sponge between upper and lower cast is not too thick.
STL-based workflow
As an alternative to CBCT-scanning the dental cast models, IPS CaseDesigner supports to a limited extent a workflow based on surface-scanned dental cast models (.STL files). These .STL files can be obtained by an intraoral scanner or by a dental lab scanner. However, in this .STL-based workflow, you need to take into account the following:
For the dental cast scan, separate .STL files for the upper and lower dental models need to be provided.
When working with .STL files, surface models are closed automatically by the software. Holes around brackets or in the occlusal area are not automatically closed though, so make sure to preprocess these files in another application and turn them into 'watertight' models before using them in IPS CaseDesigner.
We advise you never to combine .STL files and DICOM files in a single patient case.